Many homeowners avoid the task of installing tile in their homes. Although installing tile by yourself can be difficult, once you have done it several times and have the right tools and some confidence, you will find it an invaluable skill to add to your repertoire. This week, I’ve teamed with Kobalt Tools and shared 10 DIY Tiling Tips to Tile like a Pro! You can follow along with my tips in the video or scroll down to see them all!
This project includes a paid integration with Kobalt Tools. All opinions expressed herein are mine. For more information about affiliates and compensations accepted by this site, please visit my Disclosure page.
1) Get the Right Tools
You will need basic tools to help you install your tile. These are the tools I recommend you keep on hand:
- A hammer
- A pencil
- A level
- Utility Knife
- Mix mortar using a drill and paddle mixer
- You can choose from a variety of notched trowels (1/2” to 5/32’s, or 3/16” depending upon your application
- Rubber grout float and sponge
- Knee pads
- A clean bucket
- A tile cutter. A tile cutter. If you don’t have one or can’t rent one, an angle grinder with diamond cutoff knives, or a small saw with diamond cutoff knives, can be used.
Many thanks to Kobalt Tools, who sent me many of these tools to test.
2) Make sure your Subfloor Is Level and Flat
You will need to ensure that your tile floor project is level and flat. To set your tiles, you can either use a cement backerboard or a dry pack mortar board. While a backer board application is easier to do yourself, you can also make your own mortar bed to level uneven surfaces. A self-leveling product can be used to adjust the subfloor and then to apply a backerboard or another membrane to tile over it. Wood expands and contracts, so you should never tile directly on top of it. This can cause grout and tile to crack.
3) Learn the difference between Thin Set Mortar (mastic) and when you should use each
When installing tiles, there are two main types of adhesive.
1) Mastic:
Commonly known as Tile Adhesive, it is sold in stores. Mastic is a glue-like product that can be pre-mixed and used only in dry applications such as kitchen backsplashes. Mastic is more stickier than mortar, so it’s great for vertical wall applications that are not exposed to moisture. To install a backsplash using mastic, I use a 3/16″ or 5/32” notched trowel to apply the mastic to small areas of the wall. Then, I press the tile into place with a grout flotation to ensure it sits properly. The trowel’s notches help to secure the tile. Also, make sure that you don’t apply too much mastic. This can cause cracks and problems, especially for small mosaic tiles.
2)Thin-Set Mortar
Thin-set, on the other side, can be used for any purpose and is my preferred method of tile installation. Thinset is packaged in boxes or bags and mixed with water to make a peanut butter-like paste. Thinset is great for flooring, bath enclosures and large-format tile installations. Make sure your notches run in the same direction.
4) Layout lines are a good idea
Sometimes older homes have rooms that aren’t perfectly square, so it can be hard to predict how the tile will look once it is installed. For square and rectangular tiles, I always refer to the longest wall of the room and draw an imaginary line through the middle. I always add at least one perpendicular line. These lines are used to ensure that the course of the tile is straightened when I install it. You can use the Pathagoreon rule or 3-4-5 rule depending on how square or not square your room is to make square lines.
5) It is very important to choose the right course.
The first tile course is crucial to ensure a high quality installation. To ensure that you don’t have any slivers at the ends, it is a good idea to plan the tiles. I prefer to have about a half-inch of tile on each wall. Sketchup is a great tool to help you plan your tile layout and determine the best way to set your first course. My preference is to keep cuts away from the primary eye-line. I prefer to keep them at the edges of the room.
6)Know when to use back butter
A large format tile refers to a tile larger than 12’x12′. Back buttering is a technique that’s used to install large format tiles. Back buttering is the process of applying a thin layer of thinset to your tile’s backside using the flat side or trowel. The tile will be fully supported if it is pressed into the mortar joints on the wall or floor. If something falls in those areas, air gaps can cause cracks or breakages in the tile. Back buttering is not necessary for most small tile applications, such as subway tiles.
7) Trim your Door Casing!
A professional tile job is almost always easier to distinguish than a DIY job. My biggest DIY error is in how they handle cutting around door jambs/frames. People often cut around the door casing, which is fine if done well. However, you have now encased it in so that you can change it later. You should use an oscillating tool or a knife to remove the casing and allow you to slide the tile under it. This will give you a neat finish, and you can easily change the casing later if you need. Uneven tiles are another common mistake that I see, which brings me to my next point.
8) Use Tile Leveling Spacers to Minimize Lippage
Tiling can be a complicated science. It is not easy to get it right. The tile’s ability to set can be affected by small changes in mortar quantity, floor irregularities, and loose stones in mortar. To minimize lippage, I recommend tile leveling spacers. Lippage is when one tile is too proud of another tile. This can be easily seen or felt underfoot. Installing leveling spacers can be used to correct any problems.
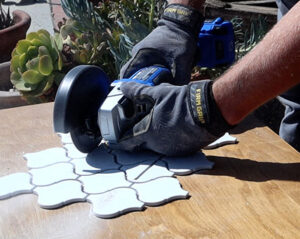
9) Use an Angle Grinder To Create
It can be tricky to cut radius cuts or in the middle of tiles for something like a receptacle. To make these cuts, I prefer to use an angle grinder and a diamond cutter wheel. You can also score lines in the tiles and use tile cutters to make small cuts.
10.) Choose the right Grout
It is just as important to choose the right grout as the right tile. There are three types of grout available to choose from when choosing grout.
1.) Sanded Grout
Sanded grout contains a larger amount of aggregate sand and is used to space larger tiles. If you plan to use a 1/4″ tile spacer, you will want to ensure that you select a sanded grout.
2.) Non-sanded grout
Non-sanded grout, on the other side, is a finer grout that is used for tile applications with spacing between tiles of 1/8″. To keep dirt and grime out of grout grouts, use a grout sealant.
3.) Epoxy Grout
Epoxy grout, unlike non-sanded or sanded grout, is made from epoxy and is waterproof and durable. It can also resist staining and cracks, unlike cement-based products like Non-Sanded Grout and Sanded Grout. The application process can be more difficult, more expensive, and it has a more plastic-like appearance.
My Grouting Tips
For most flooring applications, I prefer to use grout that is as close as the floor tile as possible. This helps to reduce the possibility of any differences that may be caused by dirt and grime buildup. But that’s just me.
Mix the grout like mortar, but slightly less watery. Then spread it over the tile with a rubber flopper. Once the grout has hazed for 30 minutes, you can wipe it off with a sponge. I prefer to use a disposable mop for my back and knees.
These are my 10 Tiling Tips. These tips will be helpful in your next DIY tile project. These are more tips and tricks that you might find useful if you enjoyed this article.


